

Docs/ Espresso Cloud
Static Sites
Espresso Cloud can build and host frontend applications that output static assets — plain HTML/CSS/JS sites, and single-page applications (SPAs) built with React, Vue, Angular, Svelte, or any similar framework.
Espresso clones your repository, runs your install and build commands in a Node environment, uploads the output directory, and serves the files over HTTPS with Caddy. SPA frameworks get client-side routing — unknown paths fall back to index.html so deep links work.
Frontend builds only
Static Sites are for frontend build apps — projects that produce a folder of static files (e.g. dist, build, out). Espresso does not run a persistent Node.js server for your app. APIs, SSR backends, and long-running Node processes belong on a different hosting model.
This guide covers the Static Sites list, the Add Static Site form, and day-to-day operations. For GitHub account setup, see App & Github Configuration. For custom domains and DNS, see Connect a Custom Domain.
Overview
- Static Sites list — browse and search deployments you own or manage.
- Create a static site — connect a repo and configure the first build.
- Static site detail page — uptime, configuration, build logs, and actions.
- Repository source — GitHub App or public URL / token.
- Build settings — Node version, framework, package manager, and output directory.
- Advanced build settings — custom install/build commands and optional Caddy config.
- Connect your domain — default
*.zimplify.cloudURL and custom domains. - Deployment notifications — email alerts on build success or failure.
- Environment variables — inject values into the build process.
Static Sites list
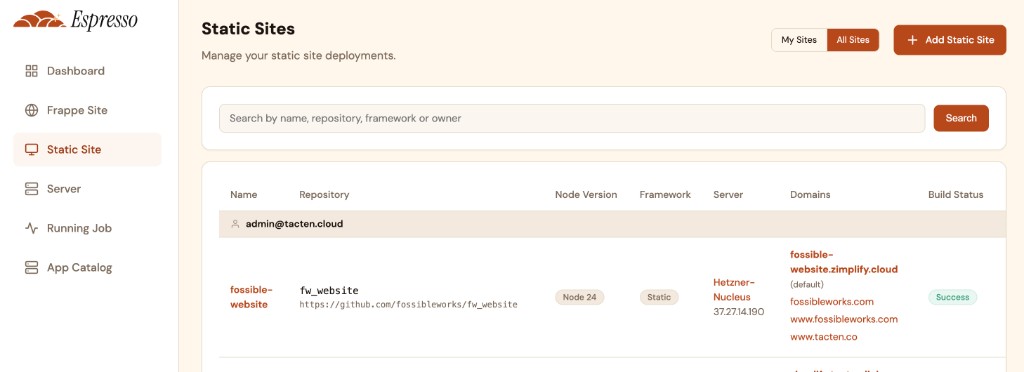
Open Static Site from the Espresso Cloud sidebar to see every static deployment in your account.
My Sites and All Sites
Use the toggle at the top to switch views:
- My Sites — static sites you own.
- All Sites — every static site you can access (including sites owned by teammates, when your role allows it).
Search
Use the search bar to filter by name, repository, framework, or owner. Click Search to apply the filter.
Table columns
Each row shows one deployment:
| Column | Description |
|---|---|
| Name | The site identifier you chose at creation (e.g. fossible-website). |
| Repository | GitHub repo name and clone URL. |
| Node Version | Node.js version used for the build (e.g. Node 24). |
| Framework | Framework preset (e.g. Static, or an SPA framework). |
| Server | Hosting server name and IP (Espresso-managed or BYOC). |
| Domains | Default *.zimplify.cloud domain and any custom domains. The default domain is marked (default). |
| Build Status | Result of the latest build (e.g. Success). |
Rows may be grouped by owner email when you view All Sites.
Click + Add Static Site in the top right to create a new deployment.
Create a static site
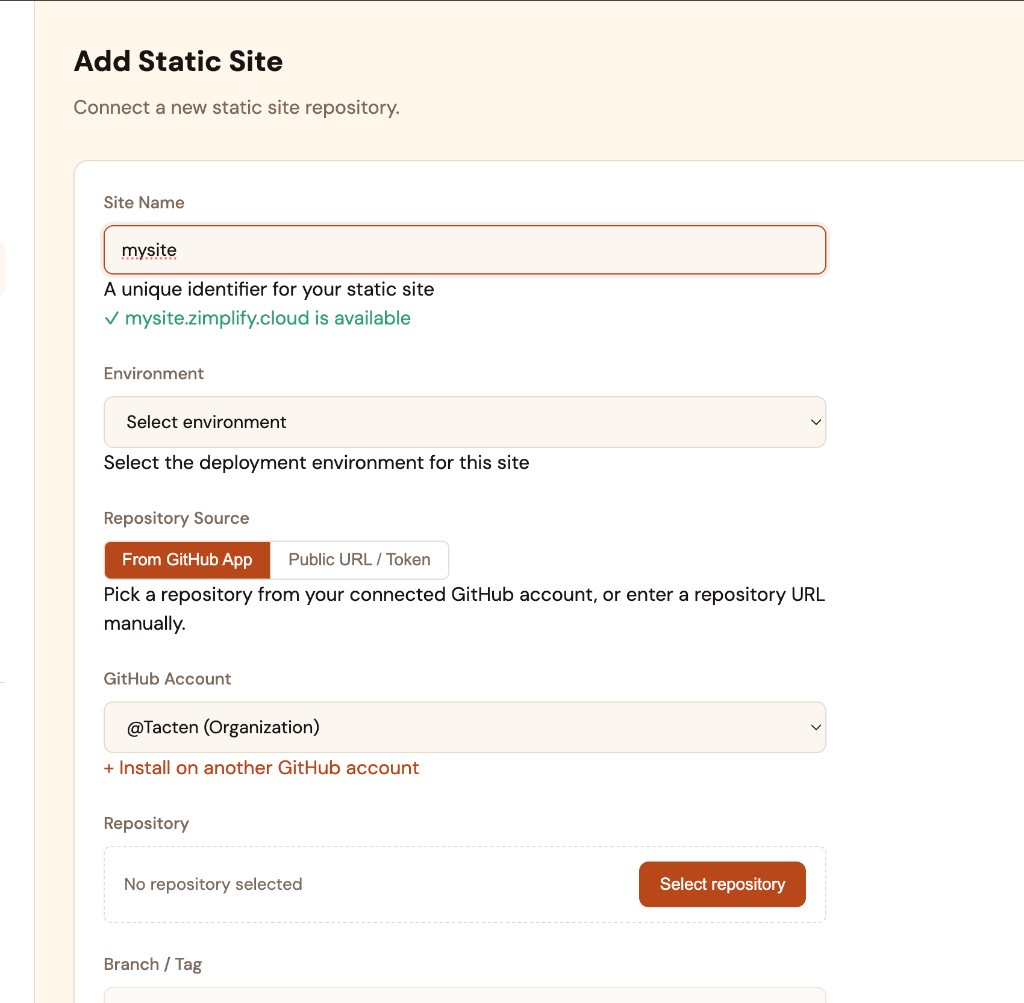
From the Static Sites list, click + Add Static Site to open the Add Static Site form. Fill in each section, then click Create Static Site to save and start the first build.
Site name
Enter a Site Name — a unique identifier for this deployment. It becomes your default URL:
your-site-name.zimplify.cloud
The name must be unique across Espresso. Espresso checks availability as you type (e.g. ✓ mysite.zimplify.cloud is available). The name cannot be changed after creation.
Environment
Choose an Environment label (e.g. dev, staging, prod). This is for organizing and filtering your sites — it does not change how the build runs.
Repository source
Pick how Espresso reads your source code:
| Option | When to use |
|---|---|
| From GitHub App | Repo on a GitHub account or organization already connected to Espresso. |
| Public URL / Token | Paste a repository URL manually — useful for public repos or private repos with a personal access token. |
For the GitHub option, connect GitHub once from Account Settings.
From GitHub App
- Choose the GitHub Account (e.g.
@Tacten (Organization)). - Click Select repository and pick a repo from the list.
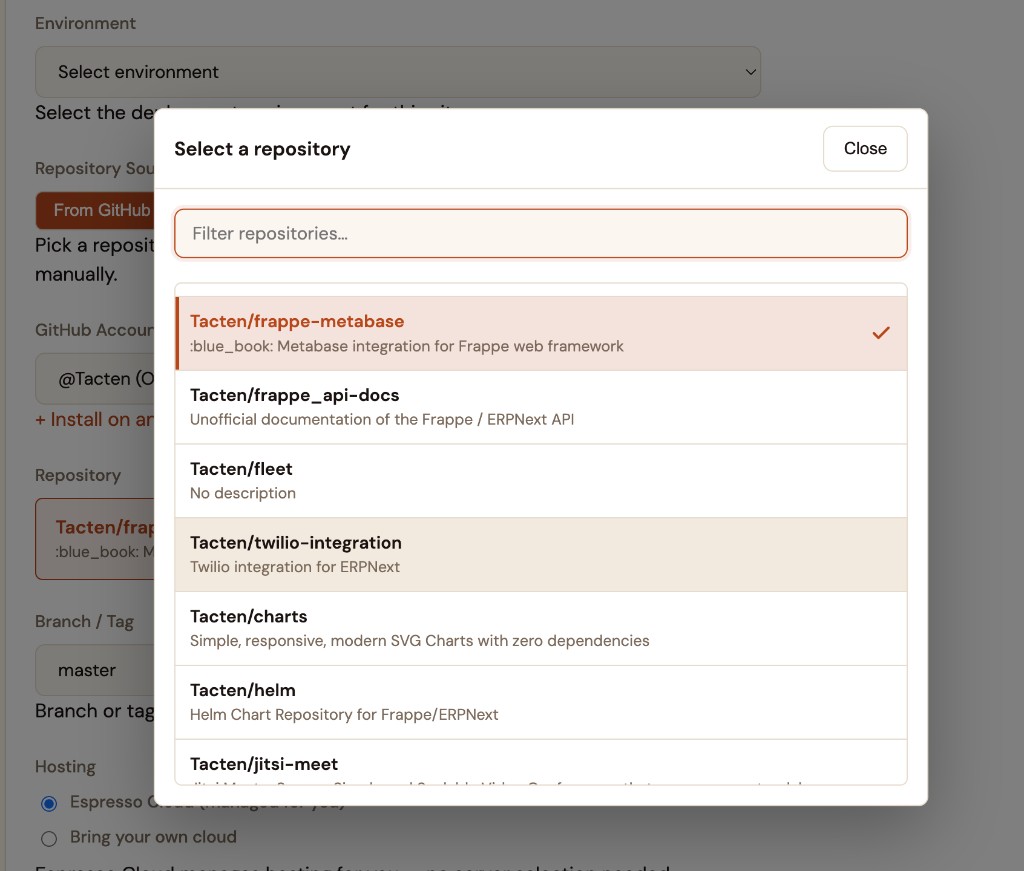
Use the search box in the modal to filter repositories. Click a row to select it, then close the modal.
- + Install on another GitHub account — link an additional user or organization (same flow as Connect GitHub from Account Settings).
Public URL / Token
Enter the clone URL and, for private repositories Espresso cannot reach through the GitHub app, an access token. This mirrors the Manual Entry flow used for Frappe apps.
Branch / Tag
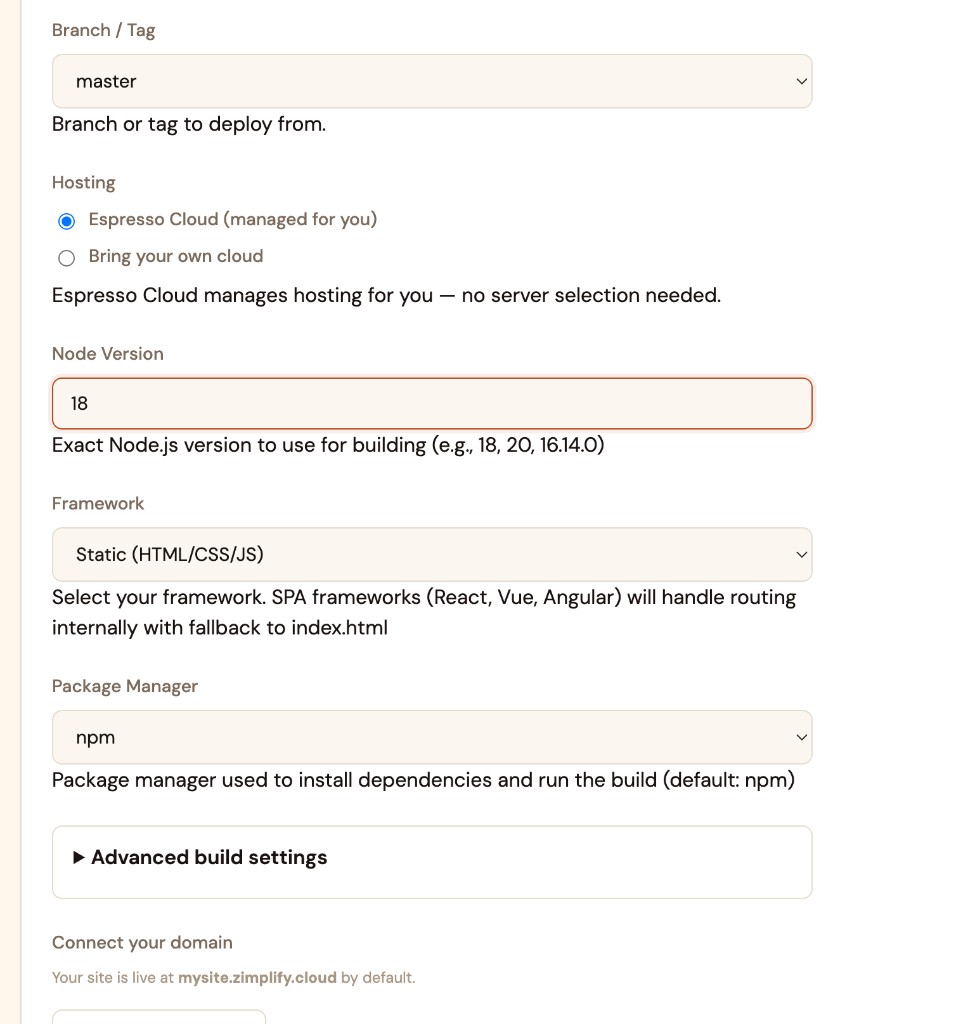
Select the branch or tag Espresso should build from (e.g. master, main, v1.2.0). Each new build clones this ref.
Hosting
Choose where the built files are served:
| Option | When to use |
|---|---|
| Espresso Cloud (managed for you) | Espresso provisions and manages the server — no server selection needed. |
| Bring your own cloud | Serve files on a server you own and have already connected to Espresso. See BYOC Setup. |
The hosting server cannot be changed after the site is created.
Build settings
Node version
Enter the exact Node.js version to use during the build (e.g. 18, 20, 16.14.0). Match the version your project expects in .nvmrc, engines in package.json, or your framework docs.
Framework
Select the framework preset that best matches your project:
| Preset | Behavior |
|---|---|
| Static (HTML/CSS/JS) | Plain static files — no SPA routing fallback. |
| SPA frameworks (React, Vue, Angular, etc.) | Client-side routing with fallback to index.html for paths that are not files on disk. |
Pick the SPA preset that matches your stack so deep links and browser refresh work on routes like /about or /dashboard.
Package manager
Choose the tool used to install dependencies and run the build script — typically npm, yarn, pnpm, or bun. Espresso uses this to construct the default install and build commands.
Advanced build settings
Expand Advanced build settings when the defaults do not match your project.
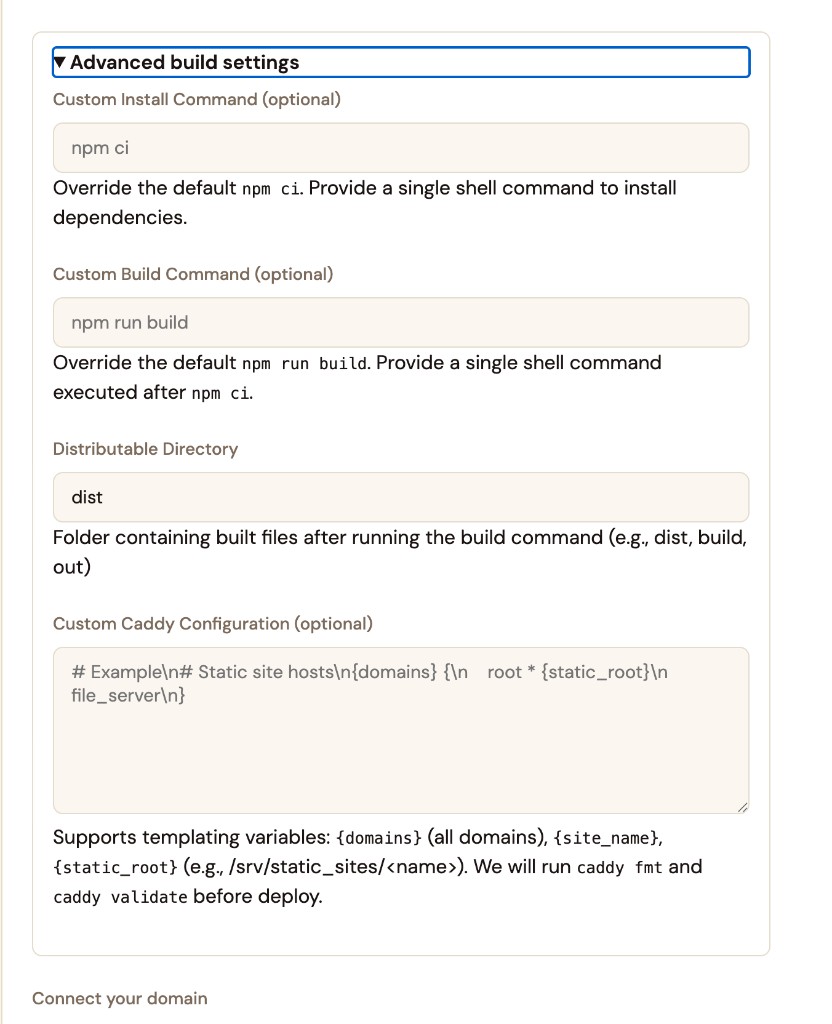
| Field | Default | Description |
|---|---|---|
| Custom Install Command | npm ci (or equivalent for your package manager) | Single shell command to install dependencies. |
| Custom Build Command | npm run build | Single shell command run after install. |
| Distributable Directory | dist | Folder containing built files after the build finishes. Common values: dist, build, out. |
| Custom Caddy Configuration | (empty) | Optional Caddy snippet for advanced routing. Espresso runs caddy fmt and caddy validate before deploy. |
Custom Caddy configuration
Most sites should leave this empty — Espresso configures static hosting automatically. Use it only when you need custom headers, redirects, or other Caddy directives.
Template variables available in your snippet:
| Variable | Meaning |
|---|---|
{domains} | All domains attached to this site. |
{site_name} | The static site name. |
{static_root} | Filesystem path to the built assets (e.g. /srv/static_sites/<name>). |
Example starting point:
# Static site hosts
{domains} {
  root * {static_root}
  file_server
}
Connect your domain
Every static site gets a free default domain:
your-site-name.zimplify.cloud
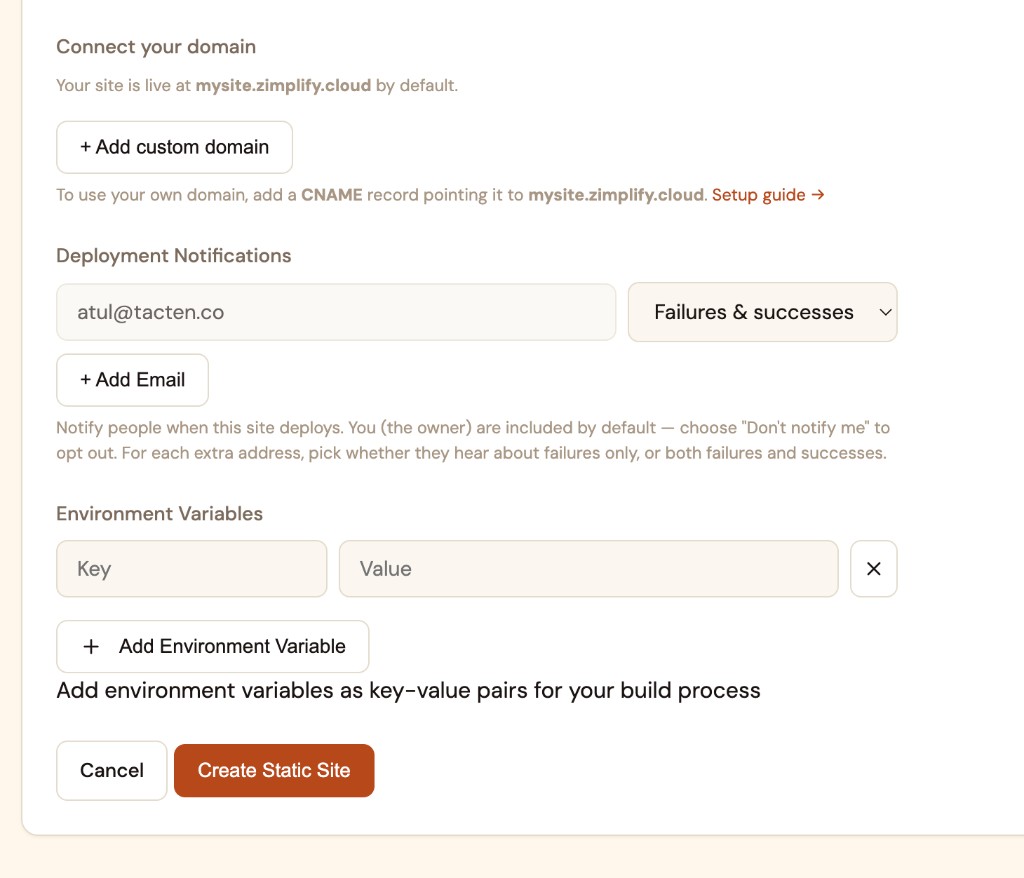
Click + Add custom domain to attach your own domain (e.g. www.example.com). Add a CNAME record at your DNS provider pointing the custom domain to your *.zimplify.cloud address. Espresso issues HTTPS automatically once DNS resolves.
See Connect a Custom Domain for the full DNS walkthrough and provider-specific links.
Deployment notifications
Espresso emails people when this site builds. You (the owner) are included by default — choose Don't notify me to opt out.
For each extra address, click + Add Email and pick a notification level:
| Option | When emails are sent |
|---|---|
| Failures & successes | Every build — success or failure. |
| Failures only | Only when a build fails. |
| Don't notify me | No emails for that address. |
Environment variables
Use Environment variables to pass key/value pairs into the build process — for example VITE_API_URL, NEXT_PUBLIC_BASE_PATH, or NODE_ENV=production.
- Enter a Key and Value.
- Click + Add Environment Variable for more pairs.
- Remove a row with the X icon.
These variables are available when install and build commands run. They are not injected into the served static files unless your build tool embeds them at compile time (as Vite, Create React App, and similar tools do).
Create or cancel
Click Create Static Site to save the configuration and start the first build. Espresso clones the repository, runs your build, uploads the output directory, configures Caddy, and sends deployment notifications to the addresses you configured.
Click Cancel to return to the Static Sites list without creating anything.
Once the first build completes, the site appears in the list with Build Status and is reachable at your default (and any configured custom) domains.
Static site detail page
Click a site name in the Static Sites list to open its detail page. The header shows the site name and the subtitle Static site details and configuration.
Header actions
| Action | Purpose |
|---|---|
| Edit Site | Open the full settings form — repository, build commands, domains, notifications, and environment variables. |
| Build Site | Start a new build with the current configuration and deploy the output to the server. |
Uptime monitor
The Uptime Monitor section shows whether the site is currently reachable and historical uptime:
- Current status — Up (green) or Down.
- 24h / 30d / 365d — uptime percentages for each window.
Click Open Status Page for a dedicated public status view.
Configuration and Build Logs
Two tabs sit below the uptime monitor: Configuration and Build Logs.
Configuration tab
The Configuration tab is a read-only summary of how the site is set up:
| Field | Description |
|---|---|
| Repository | Clone URL for the source repo (e.g. https://github.com/org/my-app.git). |
| Node Version | Node.js version used for builds (e.g. Node 18). |
| Distributable Directory | Output folder deployed to the server (e.g. dist). |
| Package Manager | Tool used for install and build (e.g. npm). |
| Install Command | Shell command that installs dependencies (e.g. npm ci). |
| Build Command | Shell command that produces static assets (e.g. npm run build). |
| Framework | Framework preset (e.g. React). SPA presets show SPA routing enabled when client-side routing fallback is active. |
| Branch | Branch or tag built on each deploy (e.g. main). |
| Webhook URL | URL to add in your GitHub repository settings to trigger automatic builds on push. Use the copy icon to copy the full URL. |
| Server | Hosting server name and IP address. |
| Domains | Default domain (marked default domain) and any custom domains attached to the site. |
| Custom Caddy Config | Your custom Caddy snippet, or Not configured (using default Caddy block) when Espresso manages routing automatically. |
| Build Status | Result of the latest build (e.g. Success). |
| Created | When the site was first created. |
| Last updated at | When the site configuration or deployment last changed. |
To change any of these settings, use Edit Site in the header or Edit Configuration in the Actions section.
Build Logs tab
Switch to Build Logs to read the console output from the most recent build. The panel shows when the last build ran and a status badge (e.g. Idle when no build is in progress).
Logs are timestamped and include the full pipeline — dependency install, compile/bundle steps, asset sizes, and deployment messages such as Deploying build to server… and Build completed successfully. Use this tab to debug failed builds or confirm which Node and package-manager versions ran.
Environment variables
Below the tabs, the Environment Variables section lists every key/value pair configured for the build process (e.g. VITE_API_URL). Values are shown on the detail page for reference; edit them from Edit Site.
These variables are available during install and build. They appear in the served site only when your framework embeds them at compile time.
Actions
The Actions section at the bottom provides shortcuts to common operations:
| Action | Purpose |
|---|---|
| Trigger Build | Same as Build Site — clone the repo, run install and build, and deploy the output. |
| Edit Configuration | Open the settings form to change repository, build commands, domains, or environment variables. |
| Delete Site | Permanently remove the static site, its deployed files, and build history. This cannot be undone. |
Before you delete
Deleting a static site removes the deployed assets and configuration from Espresso. Confirm no production traffic still points at the site's domains before deleting.
Automatic builds via webhook
Copy the Webhook URL from the Configuration tab and add it as a webhook in your GitHub repository (Settings → Webhooks → Add webhook). Espresso rebuilds the site when you push to the configured branch — the same CI/CD model as Frappe sites.
If pushes do not trigger builds, confirm the webhook is active in GitHub and that commits land on the branch shown under Branch on the Configuration tab.
What works well
Espresso Static Sites are a good fit for:
- Marketing sites and documentation built with Astro, Hugo exports, or plain HTML.
- SPAs — React (Vite, CRA), Vue, Angular, Svelte, and similar frameworks that output a static
distorbuildfolder. - JAMstack frontends that call external APIs — your API can live elsewhere; Espresso only serves the built frontend.
What is not supported
- Node.js backends — Express, Fastify, NestJS servers, or any app that must keep a Node process running to serve requests.
- Server-side rendering at runtime — builds that require a live Node server per request (unless you static-export at build time and serve only the exported files).
- WebSockets or long-lived server connections on the static hosting tier.
If your project needs a persistent application server, use a Frappe site or another hosting model — not Static Sites.
Good to know
- Builds run on push. After the site exists, new commits on the configured branch (or webhook events) trigger rebuilds — same CI/CD model as Frappe sites.
- Match your output directory. If the build succeeds but the site is empty or 404s, check Distributable Directory matches where your framework writes files.
- Pin Node version. Build failures after a framework upgrade are often fixed by aligning Node version with your local
.nvmrcorenginesfield. - SPA preset matters. Use an SPA framework preset (not plain Static) when your app uses client-side routing.
- GitHub access. If a repository does not appear, grant the Espresso GitHub app access to it — see Connect GitHub from Account Settings.
Need help? Reach out at support@espresso.zimplify.tech with your site name, repository URL, and the build log from the latest deployment.