

Appearance
Offline Backup via S3
Espresso gives you two layers of backup protection:
- On-site backups — managed from the Espresso Cloud Site Management page. Enable daily automated backups, set a retention period, and download any snapshot to your local machine.
- Off-site backups — copies stored outside your server (S3 or any S3-compatible storage). These protect you if the server itself is lost.
This guide covers off-site setup using ERPNext's built-in S3 Backup Settings, which uploads database and file backups to any S3-compatible bucket (AWS S3, Hetzner Object Storage, MinIO, and others). It follows the official Frappe AWS S3 backup documentation.
Overview
- On-site backups in Espresso Cloud — daily backups with retention and download (full guide).
- Prerequisites — set up an Email Account for S3 backup notifications.
- Create an S3 bucket and credentials — on AWS (or skip to Hetzner Object Storage for an S3-compatible alternative).
- Configure S3 Backup Settings — enable automatic uploads from your ERPNext site.
- Restore an off-site backup in Espresso Cloud — download files from S3, then upload in Site Management (full guide).
- Restore deleted files from a versioned bucket — recover a specific backup version with the MinIO client.
On-site backups in Espresso Cloud
Every site in Espresso Cloud Site Management can run automated on-site backups without any S3 configuration. See Restore DB from Backup for the full setup and restore walkthrough.
In short:
- Open your site in the Espresso Cloud dashboard.
- In Site Management, enable daily on-site backups and set a retention period — older snapshots are removed automatically once they exceed that window.
- Browse past backups and download any snapshot to your local machine at any time.
On-site backups are the fastest way to get a recent snapshot on your machine for restore. They live on the same server as your site, so they are not a substitute for off-site storage — pair them with S3 backups for full disaster recovery.
Restore an off-site backup in Espresso Cloud
Backups stored in S3 (or downloaded from any other source) can be restored by uploading them in Site Management — no SSH required. See Restore a backup for the full step-by-step guide.
Match installed apps and versions
The target site must have the same Frappe apps installed with the same versions, branches, or tags as the source site had when the backup was taken. A database snapshot is only compatible with the app code that created it — restoring into a site with different apps or versions can cause schema mismatches, import errors, or runtime failures. If apps or versions have changed since the snapshot, align the target site first (for example with Rollback to a matching release) before restoring.
In short:
- Open your site in the Espresso Cloud dashboard.
- In the Action Bar, click Restore Backup.
- Upload all four required files (database, private files, public files, site config).
- Click Upload and Restore.
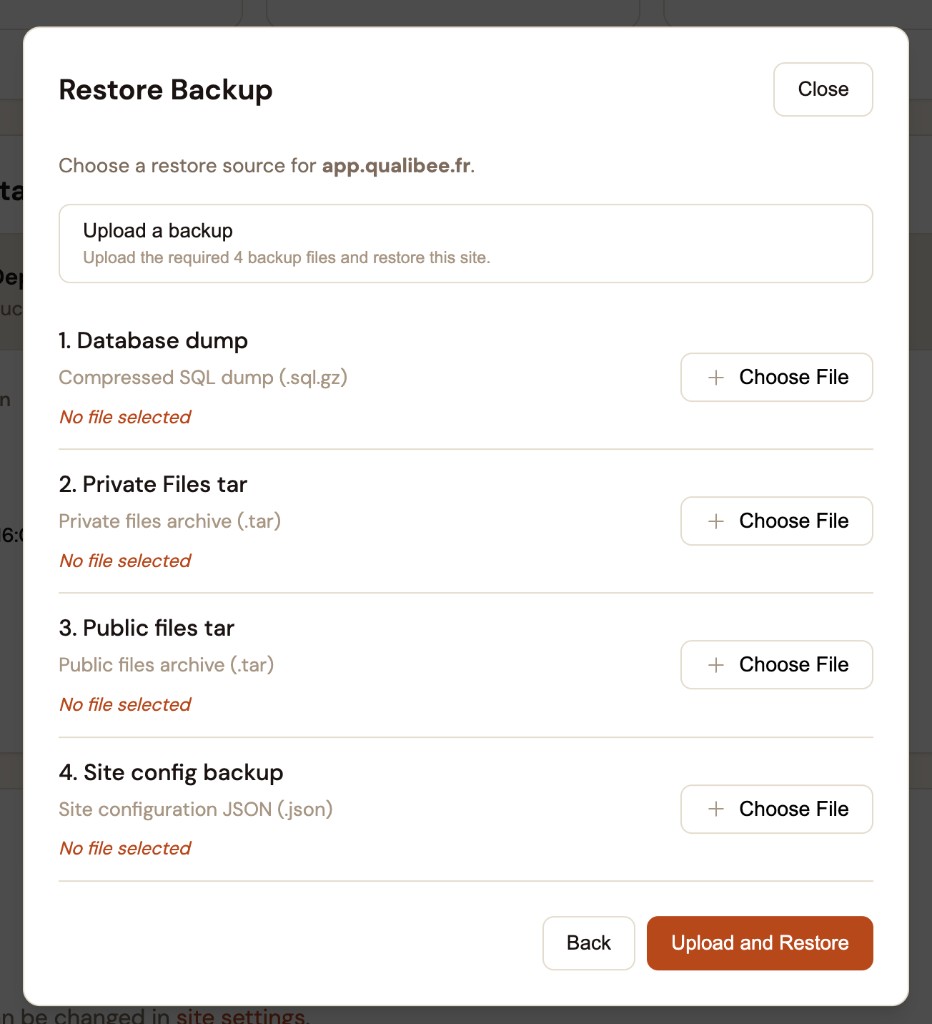
These are the same four files ERPNext produces during a backup run. Download them from your S3 bucket first (see Restore deleted files from a versioned bucket), then upload them in Site Management.
Prerequisites
Email Account
To receive emails when backups succeed or fail, create an Email Account in ERPNext first:
- Open Email Account from the Awesome Bar.
- Add an account your site can send from (SMTP or a provider like Gmail).
- Set it as the default outgoing account if prompted.
You will reference this account when configuring S3 Backup Settings.
Create an S3 bucket (AWS)
1. Create the bucket
- In the AWS S3 console, create a new bucket.
- In bucket settings, enable Block all public access so backups stay private.
- Optionally enable encryption, versioning, or Object Lock — see Amazon's S3 documentation for details.
Lifecycle rules
Use S3 lifecycle management to automatically delete old backups or move them to a cheaper storage class.
2. Create an IAM policy
- Open Identity and Access Management (IAM).
- Create a new policy for the S3 service with ListBucket and PutObject permissions.
Using the JSON editor, restrict access to your bucket and — if you know your server's outbound IP — limit requests to that address:
json
{
  "Version": "2012-10-17",
  "Statement": [
    {
      "Sid": "VisualEditor0",
      "Effect": "Allow",
      "Action": [
        "s3:PutObject",
        "s3:ListBucket"
      ],
      "Resource": [
        "arn:aws:s3:::*/*",
        "arn:aws:s3:::YOUR-TARGET-BUCKET"
      ],
      "Condition": {
        "IpAddress": {
          "aws:SourceIp": "YOUR-SERVER-IP"
        }
      }
    }
  ]
}
Replace YOUR-TARGET-BUCKET with your bucket name and YOUR-SERVER-IP with the public IP of the server hosting your Espresso site (the same IP you use for BYOC or your cloud provider's dashboard).
3. Create an IAM user
- Create a new IAM user with programmatic access.
- Attach the policy you created.
- Copy the Access Key ID and Secret Access Key — you will paste these into S3 Backup Settings.
Hetzner Object Storage with MinIO
If you prefer Hetzner Object Storage (or another S3-compatible provider), you can use the MinIO Client (mc) to create a bucket with Object Lock. In this example, nbg1 is the Nuremberg region — pick the region that matches your project.
- In the Hetzner Console, go to Security → S3 credentials and create a key/secret pair.
- Install MinIO Client on your machine.
- Configure access to your Hetzner bucket:
bash
mc alias set MY_ALIAS https://nbg1.your-objectstorage.com YOUR_S3_KEY YOUR_S3_SECRET- Create a bucket with Object Locking enabled:
bash
mc mb MY_ALIAS/BUCKET_NAME --with-lock --region nbg1- Set a default retention period (for example, 90 days):
bash
mc retention set GOVERNANCE 90d --default MY_ALIAS/BUCKET_NAME- Verify the configuration:
bash
mc retention info --json --default MY_ALIAS/BUCKET_NAMEWhen you configure S3 Backup Settings (next section), use these values:
| Field | Value |
|---|---|
| Endpoint URL | https://nbg1.your-objectstorage.com/ |
| Bucket Name | BUCKET_NAME |
| Access Key ID | Your Hetzner S3 key |
| Access Key Secret | Your Hetzner S3 secret |
Configure S3 Backup Settings in ERPNext
- Log in to your ERPNext site as a user with System Manager privileges.
- Open S3 Backup Settings from the Awesome Bar.
- Fill in the form:
| Field | What to enter |
|---|---|
| Enable Automatic Backup | Check this to schedule uploads. |
| Access Key ID | From AWS IAM or your S3 provider. |
| Access Key Secret | The matching secret key. |
| Bucket | The bucket name you created (not the full URL). |
| Endpoint URL | AWS default: https://s3.amazonaws.com. For other regions or providers, use the provider-specific endpoint — see AWS S3 endpoints by region. Do not include the bucket name in this field. |
| Notify Email | Address to receive failure notifications. |
| Send Email for Successful Backup | Optional — enable if you want a confirmation on every successful run. |
| Frequency | How often to back up — from daily to monthly. Set to None if you only want manual backups. |
- Save the settings.
- Click Take Backup Now to run a test upload and confirm everything works.
- In your S3 console (or with
mc ls), verify that backup files appear in the bucket.
Endpoint URL and region
If backups report success but nothing appears in the bucket, the Endpoint URL is usually wrong. Look up the correct regional endpoint for your bucket and enter it without the bucket name — for example https://s3.ap-south-1.amazonaws.com, not https://my-bucket.s3.ap-south-1.amazonaws.com. See the Frappe S3 backup docs and AWS endpoint reference for details.
Private and public files
If your ERPNext version exposes a Backup both private and public files option, enable it so attachments and private uploads are included in offsite backups.
Restore deleted files from a versioned bucket
If you enabled versioning or Object Lock on your bucket, you can recover a specific backup file even after it was overwritten or deleted.
List all file versions:
bash
mc ls -r --versions MY_ALIAS/BUCKET_NAME/Download a specific version by its version ID:
bash
mc get --vid TARGET_VERSION_ID MY_ALIAS/BUCKET_NAME/20260415_162402/20260415_162402-company_frappe_cloud-database.sql.gz ~/DownloadsReplace TARGET_VERSION_ID, paths, and filenames with the values from your bucket listing. Then follow Restore a backup in Site Management.
Good to know
- Two layers, one dashboard. Use on-site backups in Site Management for quick local downloads; use S3 for disaster recovery when the server is gone.
- Built-in, not a separate app. S3 Backup Settings ships with ERPNext — no extra Frappe app is required.
- Restore by upload. The Restore Backup action accepts backup files from your computer — on-site downloads, S3, or any standard Frappe backup set.
- Secure the credentials. Treat the IAM or S3 access keys like passwords. Restrict the IAM policy to the minimum actions and, where possible, your server's IP.
- Test before you need it. Run Take Backup Now after S3 setup and confirm files land in the bucket. A backup you have never verified is not a backup.
Need help? Reach out at support@espresso.zimplify.tech with your site name and the error message from S3 Backup Settings.